Saturday, January 31, 2009

Colour matching in Fiberworks PCW

I've got an order for a wool blanket in as similar a colour combo as I can get to my cotton/acrylic 'Beach' palette, or rather the modified version of Beach that I used in a blanket for the same customer recently. This was woven on that warp, but her blanket used a teal 8/8 cotton weft rather than the yellow 4/8 boucle:


The wools I use don't come in the same shades as the cottons and acrylics, of course, so I went through my sample cards and found the best matches I could. These will be the predominant colours:


As I've talked about elsewhere, it's taken me a while to get used to planning warps for my wool blankets since putting the sectional rakes on Mabes. The planning is the sticky bit, as I much prefer to let stripes happen spontaneously - I wind chains of one or more colours until they seem "about right" (very subjective!) and then switch to a new chain. Some chains are skinny, some are wide. Some are solid, some are striped. Once I've got enough threads for the warp, I flop them over the front beam of the loom and move them around until I find the arrangement pleasing. This does not work with sectional warping!

Since the advent of the rakes, I've tried planning my stripes by moving around balls of yarn or doodling on paper or by working them out in Fiberworks PCW, but nothing's been very satisfying. Fiberworks has been the best approach but I've always been frustrated by trying to get the colours to really match the yarns I'm using. I've tried their colour editor but just haven't been very successful matching the ball in my hand to the colour on the screen.

Today, though, I finally tried something I've been thinking about for ages and it was, as they say, The Business. Here's what I did:

1) I took the picture above of the colours I plan to use, without flash to get as close to the actual colours as possible.

2) I opened the picture in Photoshop and made some minor adjustments to make the colours even more accurate. In this case, that meant Image -> Adjustments -> Variations... -> more green. For some reason, when there isn't enough natural light, my camera tends to skimp on the green, like it did here.

3) I zoomed way in on each ball and used the eyedropper tool to "pick up" the colour of that ball. This required clicking on the ball several times until I got something close, as every pixel is its own colour and some are highlights, some are shadows - you'd be amazed at the variety in a chunk of seemingly solid colour.

4) This put me in the right colour neighbourhood but still didn't give me exactly what I wanted so I opened the colour editor and used the mouse to move the little circle around until the colour selection seemed perfect. The colour editor displays the colour in various ways, including its RGB value. Here's what it looks like:
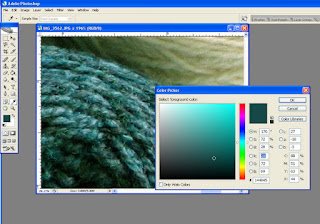


See the colour indicator in the small toolbar way over on the left? That's the one you left click to open the editor. See the little white circle in the bottom right part of the colour gradient window? That's the guy you drag around to change the colour selection. See the highlighted blue text in the colour editor? That's the R(ed) value, which is above the B(lue) value, which is above the G(reen) value.,1 This RGB value is also one of the ways you can enter colours into the editor in Fiberworks, so make a note of it. In my example, my colour's value is 20, 72, 69.

5) I opened Fiberworks and started editing the top five colours in the palette on the very right side of the screen. FYI: you'll want to avoid editing the very top value, that white one which is labeled -, 'cause doing so seems to mess up the works. Looks like that colour gets used for more than just applying colours to your warp, so leave it alone and start with the one below it, labeled 1, or whichever other one you find easiest to use.

To edit a colour in Fiberworks, right click on the little coloured box in the palette. This opens up its colour editor which, sadly, is not as intuitive or easy to use as Photoshop's. Still, if you're armed with an RGB value from Photoshop or some other photo editor, it's easy peasey to enter it into the RGB fields at the bottom - the other fields will take care of themselves:
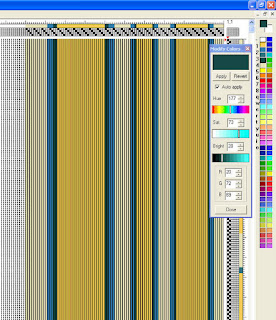

Here you can see that I've entered the RGB value from Photoshop (20, 72, 69) at the bottom of the editor and the colour at the top has miraculously changed to match my ball of yarn. You might also be able to tell that I've entered my five colours in the first five positions in the left hand column of the colour palette to the right (skipping the white one at the top). As a bonus, you can also see the stripe arrangement I settled on in the end for my blanket warp.

Happily, I have enough yarn for the warp in my stash, so I can start winding bobbins and then winding on right away. I might have to order a little for the weft since I'll put on enough for three blankets but then again I might just dig through the stash and improvise with what I've got on hand. At least in the weft I can still let my stripes be totally spontaneous!


1. Incidentally, the hex value below those - the one that starts with the hash (#) - is the colour code you'd use in html. If you ever want to make a webpage background or text match your photo, that guy's the one you want.
Oh boy! Oh no! Scarf a Day starts tomorrow!

Thursday, January 29, 2009

Knit-a-thon 2009

Ho hum. We got 10-15 cm of snow overnight and the roads aren't very navigable yet, so my morning weaving date has been postponed. I think I'll take the opportunity to get some paperwork and non-fibrous stuff done today - been putting that off for a while but the end of the month is rapidly approaching. However! I do want to share...

...An update on the Second Annual Knit-Fit (as in "a fit of knitting") Knit-a-thon:

First, this is the note I received from Chris Thomson, who works at the library and is one of the organizers:
"The Knit-a-thon is from 10 am - 5 pm on Feb 21st at McConnell Library and at Baddeck Library. Everyone is welcome to come out and knit or crochet for charity. It was lots of fun, and we hope to have door prizes and lunch donated as well. We have some yarn left over from last year and are hoping for more donations before the big day. Also hoping we don't get a snow storm this time! We had 24 hearty souls out last year and, with donations of finished products as well as yarn, we donated 250 items to the Every Woman's Centre and raised almost $1200 for Children's programs at the Library. This year the finished products will be donated to the Clothe-a-Family campaign run by the Salvation Army who will distribute the items to families in need around the region."

Wowsers! 250 items and almost $1200?! Not bad for 24 knitters, b'y! Especially considering that there was practically a blizzard on the go that day.

The knit-a-thon is organized by volunteers1 and the staff of the Cape Breton Regional Library. Last year the official event was held at the Sydney branch but a group of rogue knitters on the west side of the island organized themselves and held a knit-a-thon-in-tandem out their way, which was absolutely GRATE. This year the organizers are planning official events at both the Sydney and the Baddeck library branches, and hopefully anyone who wants to participate but can't get to one of those places will take a page from the Inverness knitters' book and have satellite knit-a-thons as well. You can read all about the organization that led up to the big day last year and see pictures of the event itself (including the much lauded yarn cake!) on the KnitFit blog.

A few more details about this year:

Everyone with an interest in knitting is invited to come, whether or not you actually know how to knit. If you do already know, bring your WIPs or start something new on the day. If you don't knit but want to learn, or know how but want to brush up your skills, now's your chance to pick the brains of dozens of teachers in one spot. There will be loads of yarn and needles aplenty and beginners can expect to have a project underway by the end of the day. Even if you just like to hang out near knitters but don't want to knit yourself, we'd love to have your company - lunch will be provided and there will be some non-knitting things to do, too - not to mention an entire library branch to browse through!

Now read that last paragraph again, but substitute "crochet" for "knit" in all cases. :)

There are donation boxes in every CBRL branch now, which we're hoping will fill up with donated yarn and all kinds of knitting and crocheting paraphernalia - needles, hooks, other kinds of equipment, books, videos, whatever - but mostly yarn! The equipment will find a good home with fledgling knitters and crocheters and the yarn will be used to make hats, scarves, mitts and other warm things which will then be donated to the Clothe A Family project. The boxes will stay out after the event as well, so that folks who finish their projects after the knit-a-thon is over can bring them in to be collected. All the collected knitted and crocheted items will be picked up and brought to Clothe A Family in Sydney, and CAF will take care of distributing them all over the island, not just in Sydney or Baddeck, so you satellite knitters and crocheters: bring your stuff to any library branch and they'll make sure it gets into the distribution chain!

I'm assuming from the $1200 figure(!!!) that knitters can also raise pledges before the event - this is an "a-thon", after all. I'm not entirely sure how that bit works but I'll do some checking and share any intel I get.

Last year local businesses donated tons of yarn and door prizes and this year promises to be the same, so don't miss out! Come join us in Sydney or Baddeck on the 21st!

1. Sidney and Carisse, two of the founding members of the Unspun Heroes, did much (most?) of the organising last year. Way to go, guys!

Wednesday, January 28, 2009

The Crackle Continues

Got the third Zielinski sample woven this evening, using the same threads and block progression as the first two:


For some reason this structure didn't beat in as much as the other two - not sure if I'm just beating more gently today or if it's something structural. Could be either one, or both.


So far, I think I like this one best, although I have a nagging worry that I got the treadling wrong somehow. It doesn't look as neat and tidy as Zielinski's drawdowns but I find that I rather like the variety of structures in the different blocks in this one more so than the others. There's a lot going on in this cloth structurally speaking, not to mention the colour changes.

I know it's hard to see the structures very well in these on-loom pics. I'll scan all the samples when they're off the loom so that they're really big and clear, but for the time being here's a side by side comparison:

Sample #1 is on the left. Sample #3 is on the right. Sample #2 was too blurry and went home. You can very clearly see the difference in the way the samples beat up -- there are the same number of blocks in both. If you squint and hold your mouth just right, you should also be able to make out the same block progression in the two samples. (The embedded picture is still Very Small - you can see the threads much more clearly if you click on the picture to see it full size.)

And now for an Artist's Way tangent:

I'd hoped to get more than one sample woven today but I finally went on my first Artist Date - I'd been thinking about it for about a week but somehow hadn't actually gone out and done it. I finally bit the bullet, grabbed my digital camera and headed out into the relatively balmy -13 degree sunshine to tromp about the yard and take some pictures. And by "some" I mean over 300. Had a great time doing that and also the editing and cropping and weeding out afterwards. Here is the result.

A friend and fellow guild member is going to come over in the morning and have a go at these samples - I'm really looking forward to it! No one but my dear ol' mum has ever come to my home and and woven on my looms.1 I'll have to find some other pattern weft for her to use since the 4/8 green is nearly used up. Just as well - no sense her weaving samples exactly like mine!

I'd really better get a move on with these samples myself, since I've got a lot to do unweaving-wise over the next two days. I really want to get this warp off by the end of the day on Saturday, 'cause Sunday is Feb 1, and you know what that means...2

1. Come to think of it, I don't think even Mom has ever woven on Mabel. Good ol' Mabes, she's a monogamous kinda gal. Makes me feel a bit guilty, actually, seeing as how I've been stepping out on her with Joey all this time, not to mention all those trysts with looms in the classroom and even a one night stand or two with Mom's looms... Poor Mabes!

2. Feb 1 is the first day of Scarf a Day, of course! Gah! and also Woo! I must say, I am feeling some trepidatious3 excitement about the prospect.

3. Is that a word? That should totally be a word... holy Hannah, it IS a word, at least according to wiktionary. I really didn't expect that. ... Ah, but I see that my New Shorter Oxford English Dictionary, Thumb Index Edition (in two volumes - big thumbs?!) does not concur. Instead, it offers up "trepidatory (adj.) of, or pertaining to, or characterized by trepidation."

I think I prefer trepidatious since it 1) sounds like it really shouldn't be a word even though you want it to be one, and 2) sounds like something out Mary Poppins.

Tuesday, January 27, 2009

The Crackle Begins

Finally got the crackle tied on this morning, tied up the treadles after my spin-in this afternoon and got down to brass tacks this evening. As anxious as I am to try non-traditional crackle like the lovely stuff on Peg's blog and this kimono I found on Fiberarts, I was a good girl and started with the standard tie up and the first two treadlings in Zielinski.

This is Zielinski's first treadling, the overshot style. I started with block D instead of A, and treadled DCBADCBA (and then another D to balance, but that's not shown in the picture).


Hard to tell from the pic, but the green pattern thread is heavier than the blue tabby - the first is about a 4/8 and the latter a 2/8. They're both colours that are also in the warp, just some of the stuff I have in my ridiculously large stash.

It reminds me a bit of log cabin and also of rep weave - although that's because I associate this kind of two colour warp and weft striping and block progression with rep weave, not because the fabric resembles rep at all.

I found the left selvage a bit fiddly when weaving block A but for the most part it went smoothly once I got into the rhythm of it - as much as I can "get into the rhythm" with a two shuttle weave. I have to say that, although I like the fabric, I did not love weaving this for the same reason I don't like overshot - two shuttle weaves are S L O W.

I like a weave structure that I don't have to concentrate too vigorously on, because weaving for me is a sort of moving meditation. The shuttle goes and my body moves along with it, but my mind is a thousand miles away, planning the next project, processing stuff that's happening in my life, dreaming up new things to try, whatever. When I have to keep my attention focused on changing shuttles and picking one up from under the other on this block and from over the other on that one, I don't enjoy the process as much.

Needless to say, I'm anxious to try weaving it with a single shuttle and also turned crackle. Even so, I want to try the traditional sorts too, at least once, so after treadling #1 I did treadling #2, the summer and winter style, using the same block progression:


I can't decide which I like the look of better but I did enjoy weaving the second one more. Whether that's because I'd gotten more used to the rhythm and so found I had to concentrate less or because something about not repeating the same treadle over and over with my left foot was more pleasant, I'm not sure. Funny how such a little thing can make a difference, isn't it?

So that's #1 and #2. I'll do #3 in the morning and then I want to repeat a couple of them again using a single shuttle, first with the heavier thread and then with the finer, to see what difference that makes. And THEN I'll try the stuff that tempted me in the first place.

And now it's time for dessert! Mmmm, apple pie!

Errrrr...nkgh?

Gah! So I'm weaving away on my crackle samples (pics soon, promise!) when Ron says, "Errr. Look where Brown is."


GAH! It's not clear in this picture how much she's stretching the web, so you'll have to trust me on this. She's not a very heavy cat, but there's some serious stretching action going on here. I don't know what's worse, that she's lying there on the web, stretching it so badly... or that I thought it was so cute I took a ton of pics before shooing her off the loom.


Isn't she lovely? Timid and elusive as a house hippo, Brownie is always guaranteed to show up when there's weaving going on -- though usually she doesn't do anything naughty. This, however, was Very Naughty Indeed and so (after taking about half a dozen pictures) I kicked her off the loom.

Apparently I wasn't very convincing about this, because I glanced over about two minutes later and not only was she back, she'd brought reinforcements:


Holy Headlights on Black Spot, Batman!1 Needless to say, there was much more shooing at this point, and I put a shuttle on top of the web so that she wouldn't jump back up.

And she didn't. Jump back on top, that is. No, she tried a new tactic. Right in front of me, while I was sitting here writing this and shaking my head over how cute and naughty she was, she climbed back onto the loom. This time when I glanced over, this is what I saw:


Sneaky, eh? But so undeniably cute! How can you resist a face like this, I ask you?


The answer being: by prodding it emphatically in the rear end with a shuttle!

So far, so good - she hasn't come back yet. I'm trying to decide whether I dare go upstairs for dinner, which Ron has just informed me is out of the oven, and risk my warp to her clever, daring ways.

1. Yes, you read that right. My cats' names are Black Spot and Brown Spot. No, we did not intentionally name them after plant diseases. There's a long story, but suffice to say that we rarely use their full names. At least not without getting funny looks.

1000 pieces of yarn

Oops, no post yesterday. Was this because I was working so very hard on my high fibre diet? ... ... Not so much! Although technically paper is made of fibres and puzzles are made of paper and it's a picture of yarn, for goodness sake! So yeah, I guess I was sticking to the diet! :D

What am I blathering about? Read on and learn!


Isn't it pretty? My aunt and uncle sent it for Christmas present. We don't normally exchange presents but they said they saw this and thought of me. Can't think why!


All the pieces turned over to their right side and the edges pieces (at least the ones we could find!) sorted out into the lid. The pieces in this puzzle are totally wild - all kinds of marvelous weird shapes totally different from the usual puzzle suspects. I love that about puzzles and all day long I was dreaming up ways to use puzzle pieces or their shapes in cool different ways.


Some of the balls were really easy to pick out 'cause they were the only ones of a certain colour or type of yarn. The rest got sorted into big piles to be dealt with later. Here the easy ones are mostly done.


After the easy balls, the next easiest bit was the wicker basket lid and handle and the knitting needles. The shuttles over on the side were trickier since they were close to the background colour, so they were dealt with later. Note the giant pile of red at the bottom and the purple in the middle - this after a lot of the purple was done at the top. Not shown: a third pile of red-and-purple-on-the-same-piece. There was a lot of red and purple in this puzzle, folks!


Those pesky purples are all done here, plus the difficult fluffy purple/red/pink/blue/green yarn in the bottom right corner. Starting to sort the reds into different shades and fibres...


The reds, the reds are done! Woot! Now just one more of the crazy multi coloured boucles and the wild green eyelash that makes up the whole top right corner and much of the right side.


Ta da! The final result! Isn't it purty? Note the glare from the overhead light - made it really difficult to work on from some angles, not to mention to get a good pic. And yet, you can really clearly see the shape of the puzzle pieces inside the glare, so I've decided that I love it after all. :D

Sunday, January 25, 2009

What a difference...

...Photoshop can make! Check out these before and after shots:

The one on the left is the original. The one on the right is much closer to the actual colour of the fabric.

A narrow slice of light

As I've said before, I struggle with how to take pictures of hand woven fabric. I want them for my own records, of course, but I also need good photos to put on the shop website, on the photo frame we have on the counter in the shop, for marketing and advertising, on my blog, etc. etc. It's tricky to get a picture that shows off an item well, shows off the woven structure, shows off the particular features of the item you want to showcase, etc. etc.

Last time I mentioned photography, Peg pointed me to David Taylar Daniel's blog and I've since spent a lot of time enjoying his posts and inspecting his beautiful pictures for clues. I absolutely love this one from this post, and am very intrigued by this one from this post, too.1 I particularly like the way the second one looks like he's just dangled the scarf from a height and dropped it into a pile.

Of course, one of the things that make David's pictures so beautiful is the lighting and one of my biggest problems with photography is that my house has very little light - a sad fact that has meant the death of many houseplants since we moved here. There are only two windows that get much light: the bedroom and the office, neither of which is suited for taking pictures. My dining room window gets a fair bit of indirect light for a narrow slice of the day, so that's where and when I take most pictures.

Another site that gave me some great tips about how to set things up is this one, one of Caro's many great tutorials over on splityarn. Her setup is pretty much exactly what I've been using lately, except that mine's on the seat of the chair to get it up closer to the window instead of down on the floor.

I finished the flannel binding on the first baby blanket last night and today I wanted to take some pictures. I missed the narrow slice of light but I went ahead anyway and this time, after doing the usual shots with the blanket arranged in the usual way, I tried David's drop-into-a-puddle trick.

Here's the entire puddle from the front...


...and from the side.


The front one shows off the binding well but doesn't do much for me otherwise. The side one is a bit more interesting but it's too busy and there's too much other stuff cluttering up the frame.

Next I pulled in really tight from the side and got a picture I'm really happy with:


The colours aren't very accurate because of the lack of light but I really like the narrow focal depth and the way the fabric curves. Of course, it doesn't show off the flannel binding, nor show the entire piece so it's not really a good product shot but I think it'll work well in other places. I still need to play with it in Photoshop a bit to see if I can correct the colours but even as it is I quite like it. I forsee more puddles in my future!

The ones I took before the puddle attempt show off the binding better. Here's a close up...


...and a draped-over-the-chair shot:


I'd be very curious to know which shot(s) other people prefer, so I added a poll to the sidebar over there on the right.2. You can pick more than one if you like a couple of them. Please vote!

NB: To really see the photos well, you've got to click on the picture and see it in its own window at full size. They lose some quality when they get squashed into the frame on the blog page. The puddle close up, for instance, looks blurry on my monitor when I look at it inside the blog, but when I click it into its own window it looks quite sharp.

1. Holy cow! Sorry for the many links but there doesn't appear to be way to link directly to the pictures I mean inside their respective posts and I didn't want to put David's images on my own blog, nor give them to you completely out of context.

2.
Of course, it's going to sit there long after this post has scrolled to the bottom and I haven't figured out a way to put a link back to the post from the poll gadget. Meh, what can you do?


Update: The poll has closed! Puddle side and Binding close up got one vote each (16%), Puddle close up got two (33%), and Draped over chair got four (66%).

True confessions time: I considered only relaying the percentages so that it would look like heaps and heaps of people voted, but of course it is quality rather than quantity that counts. HFD is like the Vinyl Cafe: We may not be big, but we're small!

Thanks to everyone who voted!

Icy Birthday Candles

This is totally unrelated to fibre but they made me happy so you'll just have to bear with me for a bit. I saw this tutorial for making ice lanterns the other day and wanted to try it myself. I didn't have buckets, and I wanted smaller lanterns, and I wanted more than one, so I improvised a bit. I think they turned out pretty well - "pretty" being the operative word!


I made them on Tuesday and, since they're so small and it's been so cold here, they were probably ready by that evening. I say probably because I saved them until last night when the birthday duo were coming over and didn't want to peek before that in case it messed them up somehow. It's been way below freezing for days now but, wouldn't you know, yesterday it went above freezing and rained all day. It got cold again when the sun went down, so I went out and gave the containers a squeeze and all seemed... okay. They were a bit crinkly, like they'd fractured a bit from the freeze and thaw, so I added some fresh cold water and gave them a couple hours before opening them up. That seemed to bind them back together again all right.

I should have gone back and looked at the tute after making them; had I done so, I would have realized that she put her ice down on top of the candles like a cover to block the wind. I worried that the candles would melt onto the deck, so I put the ice down like a bowl and put the candles inside. The wind blew them out a few times but we moved them around to a more sheltered spot and then they were okay. It was maybe a little safer this way, too, simply because it was more temporary. The inside of the lanterns melted on the bottom from contact with the hot candles so before long the little darlings were swimming in water of their own making. Eventually they got wet and went out - a good thing as by then we were all downstairs having birthday brownies and not paying attention to the tiny open flames out on the deck.

Of course, as soon as the candles went out, the -18 degree temps last night froze the water right up again so now the candles are stuck. If I can figure out how to pry them loose, I'll try turning the ice over tonight and see how that works.

Fun, sparkly times!

Saturday, January 24, 2009

On cards and creativity

Man, I had a great day yesterday! The fibre Friday was fun, as always, and I had some really exciting ideas for projects I want to try. One isn't fibre related so I'll save it for another place or a future post1. The other, though, that one is a fibre thing. It's also an Artist's Way thing, a nurturing-your-inner-artist thing.

So here's the thing: I've thought about making cards out of my fabric for a long time but, you know, it's really hard to find tri-fold cards with openings that are anything other than huge (for photos) or boring old circles and squares. Huge doesn't work 'cause how do you attach the fabric and then seal the card? Boring doesn't work 'cause it's... boring. I did find these cards at Michaels that are slightly less boring 'cause the window is small and not smack in the middle of the card...

...but still, how to attach the fabric to the card? How to seal it up? How to turn it into something that not only I will appreciate?

Then yesterday, a breakthough: I've struggled with how to attach the fabric and then how to seal the card up for a while now. It's tricky! I've tried stitch witchery, I've tried double sided tape, I've tried glue... and then last night it occurred to me that I could sew the fabric to the card.2 Perhaps even sew the card closed. Huzzah! It was all I could do to go to bed instead of dashing downstairs in the wee hours and try it out, especially since the sewing machine was already out and calling to me.

And now for an Artist's Way tangent:

I've been mucking about with these cards for a while now, trying different things, mulling over different ideas... but always feeling somewhat anxious about them because I didn't know if anyone else would like them or be inclined to part with their hard earned cash in order to buy them. There's been an aura of frustration and negativity and anxiety about the whole business but I kept on with it for some reason I haven't been able to put my finger on. Partly it was 'cause I'd spent money on the supplies for the project but it was more than that, too. I really thought it was a good idea, I just worried that no one else would agree.

So this week I've been reading through the introduction and first chapter of The Artist's Way, which are about freeing things that are blocking your creativity. "I'm not blocked," I have said to myself and my friends, "at least not with regards to weaving. Other stuff, maybe. Not weaving, though." (Can you see where this is going?) I figured I could apply the ideas in the book to other things, though, so I kept thinking about the concepts. And then yesterday and the day before, the light started to go on. I am blocked, in all kinds of ways, and one of those ways is an unspoken rule I've made for myself that I should only spend time on weaving projects that are potentially items for sale. That I shouldn't expend effort on projects simply because they're fun. That I shouldn't follow an idea to see where it leads if it might lead to a mess rather than a product. Where the heck did that come from?? Geesh! Talk about blocks!

And now back to the cards. I realized that this rule that I must always create for someone else's consumption rather than my own enjoyment is what's been standing in my way. Once I realized that, I stopped worrying so much what other people will think of them. It's not gone completely, of course - I still hope that others will like them, especially the people who receive them!3 But even if they don't it won't mean the effort and the project has been a failure or in vain if I like them and have enjoyed making them.

Phew! Enough introspection! I normally wouldn't have posted all that but some of you have expressed an interest in what I'm getting out of The Artist's Way, so there you are. Installment #1 complete. We now return you to the regularly scheduled, high fibre programming:

So I dashed downstairs this morning as soon as I could and sat down at ye old sewing machine, all antsy to try this out. And then I realized that I knew nothing about what needle to use, what stitch length to use, whether you have to do something special to sew on paper, etc. etc. I was eager to experiment and try new things and allow myself the freedom to do stuff that might not work but I was not eager to break my machine. So I dashed back upstairs and did a quick websearch for intel and turned up this, and this, and some other stuff. None of it told me what needle to use but the fact that none of them mentioned it at all suggested that I could probably get away with using the regular old needle. Reassured, I dashed back downstairs and faced the machine.

Now, those of you who have followed my blog for a while or read through some of the archives will know that relations between myself and my sewing machine have only recently begun to thaw. We keep our distance, that machine and I, so up until now the idea of using its special stitch functions has seemed not only alarming but also... intrusive somehow. Like I might offend it by using them wrong. Like I might touch it in an inappropriate way. Like the SPCSM might turn up and berate me, then take the machine away to a safe house or a foster home. (Blocks? Who's got blocks?)

But those blogs... those blogs had suggested other stitches, and my machine's got those. Lots of them. 12 different stitches, 10 of which I've never used. So I forced myself to ignore that sense of impending doom, to focus on the sense of excitement I'd just been feeling, and try out those stitches. Nearly every one of them. On card stock. And you know what? They are coooooool! Yeah, yeah, I'm sure they're all very useful in all kinds of regular sewing applications, but they're just plain cool decorating cardstock! (Hello, happy inner artist!) Best of all, the machine didn't complain, the SPCSM didn't turn up, and I learned a lot, mostly about relaxing but also about how changing the tension, stitch width and stitch length affects each one (not to mention me). I fell in love with Stitch #10 in particular. It looks like a faggoting stitch to me, or at least like what I imagine a faggoting stitch looks like.

So I made my first card, using a tiny scrap of hand woven fabric that I had kicking around and my new fave stitch:


I like it! I like its simplicity. I like the way that the stitching contrasts with the cardstock and matches the fabric. What I don't like, though, is something not obvious in the picture: the fabric can smoosh around in its window - it's too loose and floppy in there.

I have no shortage of scraps of handwoven fabric or of blank cards, so I conducted some further experiments. Here are the results:


The card on the left has a lightweight iron on interfacing applied to the fabric. The one on the right has a very heavy fusible fleece applied. The one on the left uses a sparkly metallic thread that I bought years ago, gods know why. The one on the right uses black thread so that it disappears into the card. The card on the left is glued closed. The card on the right is sewn closed. I used a silver paint pen on the left card and a gold one on the right card. I put some text on the left card and left it off of the right card. Etc. etc.

The experiments are ongoing, of course. I want to try using a zig zag stitch to sew the card closed. I want to try sewing it around all four sides of the front. I want to try printing on the white cards before sewing in the fabric. I want to try all sorts of things!

But mostly, right this very minute, I want to go eat the bacon and eggs that my sweetie pie is cooking for me.


1. I will mention that this other idea led me to create yet another blog - I'm becoming an addict!

2. This is by no means an original idea. In fact, I'm sure I've seen tons of it recently on various blogs I read, including almost certainly somewhere on Poppytalk.

3. I am sooooo disappointed that I already sent my dear ol' mum's birthday pressie, or I could have given her one of these cards! Mom, imagine that one of these is in your package, please! Those of you coming over tonight whose birthdays happen to be yesterday and tomorrow, stop peeking. Shoo.

Friday, January 23, 2009

Yay for the hinter brain!

Super quickie as I'm just dashing out the door to my weekly Fibre Friday gathering. Here's a sneak peak at the crackle sample that's going on the little loom.


I chose the colour rotation on a whim, used the four blocks three times and then repeated the first one to "balance". I used a point block threading (ABCDCBABCDBCA) which by pure luck requires just that many blocks. Maybe my hinter brain knew this when I started out, but I didn't know it was going to happen until it did. Yay for hinter brains that are smarter than we are!

Am anxious to tie on and start exploring but first I've got a library date with some baby blanket edging, a pair of socks, and a bunch of friends!

Thursday, January 22, 2009

Scarves today, scarves tomorrow

Okay, so here's the deal. I've been toying with the idea of a Scarf A Day blog for a while now. Then yesterday I wanted to learn something about the way Blogger blogs are set up and I created the Scarf A Day blog to test my idea, figuring I'd use it when the time came, if it came. Silly me, I thought it could sit there, unnoticed, until I needed it. Here it is, mere hours later and, lo, it already has a follower!1 Which is GRATE, and exciting, and inspiring -- some of the reasons I was considering the project in the first place, so it's all good. I just wasn't ready to actually do anything with it yet. Now I figure I'd better post a little bit of expo to explain, to tantalize, and to cement my intentions to go ahead with this beastie.

The basic idea is pretty simple: I'll weave a new scarf every day and put pics online. Beyond that, the details and ground rules still need work. Am I really going to do this every single day, or just on weekdays? For how long a period? Do I have to warp the loom every day, or am I allowed to weave more than one scarf off a single warp? If so, how many from one warp is okay and how dissimilar should they be? Am I allowed to wind a bunch of warps ahead of time or does the entire idea have to happen in a single day? Does the scarf have to be finished (i.e. fringes done, wet finished, pressed, whatever) the same day that it's woven? Do I post the hot-off-the-loom scarf before finishing, or the finished scarf, 'cause that can take overnight. Do I post progress shots so people can see the scarves under way or just finished product shots? Etc. etc.

There are other kinds of questions that need answering, too, like how do I manage this project with the other production and guild sampling that needs to happen on the same loom? How do I manage this project with all the other stuff going on in my life, like getting ready to open the shop in four months, or the other people in my life? My husband has said, "I don't care if you do a scarf a day, but I don't want to have to," meaning that he doesn't want to be pressured into keeping me company as I desperately try to finish a scarf by midnight or when I get tired of the idea but feel like I have to keep going. Fair enough. He's also worried about scheduling - what if he wants to go on a trip, what then?

At the moment, I'm thinking of these answers to all those questions: I'll just do the month of February, and I'll only commit to doing week days. I will try to put on a new warp almost every day, or every other day, but won't make any promises in that regard. I'd rather warp for three or four scarves at once and I'll still have blankets and other production going on the big loom, so it might take me a couple days to get four scarves off the small one. I'll make sure that every scarf is unique but it might just be a change in weft colour that sets one apart from another. And, if something really important (family is important!) comes up, I'll just miss a few days. Big deal. As for the other stuff, I'll make up answers to those questions as I go. I'm making the rules here, after all.

And now, since a post sans pictures is boring, here are some shots of the scarf anna half from yesterday. Guess which is which!


As you can see, another really critical question I have to deal with is "how the heck do you take good pictures of scarves?" Here's a better close up of the fabric:


1. Hi, Laura! Thanks! :D

Scarf and a half

So it turns out there was only half a scarf left on Joey, which means I now have about 40" of narrow sample fabric to turn into ... something, and 6 yards of crackle warp on the loom!

Since I'm thinking of using crackle for the rocking chair fabric, I figured I might as well make some samples that will give me an idea of what that'd be like. I chose four colours that are reminiscent of the colours in our drapes (natural, blue, green and yellow) and rotated them through the warp stripes: NB, BG, GY, YN. I'll change threading blocks at the colour boundaries but will rotate through them in a way that will keep the same colours from appearing in the same blocks every time. Or something - I'm making this up as I go along.

Still trying to decide whether to stick to a 4 shaft threading to begin with or try an 8 shaft threading. Will probably go with the 4 and try some of the traditional tie ups and treadlings (overshot, summer & winter) as well as the style I'm thinking of for the chair - the point of the exercise is to learn about crackle in all (well, many) of its permutations. I can always do an 8 shaft threading on the next warp.

Ooo, the dryer's buzzing. Time to go see how my scarf and a half turned out!

Wednesday, January 21, 2009

Never a dull moment

The rosepath is done! Not cut off the loom yet but the weaving is finished. I decided to use a temple after the first yard or so just to speed things up a bit.


I'm not sure why I hesitate to get the temple out so often - I guess I feel like it's going to slow me down so I'd rather avoid it if possible. I must admit, there's also a sense of guilt, like I ought to be able to weave without one and I'm faulty some how for needing one. Where does that come from, I wonder? At any rate, I got out the temple and that sped things up quite a lot, as I didn't have to fuss so much about draw in, just about beating too hard.

Incidentally, in spite of my hang ups about temples, I have a lot of them and really like them all. The one in the pic is a wooden one from Glimakra that I got along with three or four others from Madelyn Van der Hoogt when I took her Weaving II course (including one for the Centre where I teach). It's the kind I use for delicate fabrics or narrow warps. I've also got two heavy metal Toika temples that I got from The Weaving Works to use on blankets and rugs.

Anyhoo, the rosepath. I realized today that I've been referring to it as "the rosepath" even though it's really bits of point twill on a basket weave ground. The treadling, though - that's rosepath. I like this angle because it shows off the stripes down on the cloth beam. Pretty, huh?


Not sure yet what this fabric will become - depends on what happens in the fulling, really. I'm still thinking some kind of cocoon but it might also be hats or pillows or something else entirely. I'm sure it'll let me know what it wants to be eventually.

I also wove a scarf on Joey this morning, so now there's only one or two left on that warp, too. Haven't posted a pic of that warp yet, so here you are:


I wove some scarves in this palette for the show I did last November and it was quite popular with the gents, so I put it on again. I hardly ever repeat warps like that but hey, rules are meant to be broken, eh wot?


I've also neglected to post pics of the socks-in-progress, so here they are as well:


This is my second time using this sock pattern and the first using my new needles with the more flexible cord - definitely an improvement! I've realized lately that I don't like my socks to come very far up my leg, so I made the tops of this pair shorter than the last. I'm afraid they might be just a bit too short, but this is a learning process. Eventually I'll figure out The Perfect Sock and then I can make loads of them!

I'm anxious to get these done so that I can try a new pattern that my mother's friend Peggy sent me. I used her instructions for Kitchener stitch to graft the toes of the blue and brown pair and they worked a treat, so I'm really eager to try out the entire pattern. I think Peggy's considering selling this pattern but she's given me permission to share it with my local fibrous friends as long as each person who gets it donates a pair of handknit socks to a local charity. Isn't that lovely? :D


In other knitting news, now that I've given away the gift, I can show you pics of the silly doggy shrug I made for my friend Marg and her dog Millie for Christmas:


The only explanation I have for this is that it seemed like a really good idea at 3:00 aye em. I hunted around online for a dog coat pattern that I could make pretty quickly and found this really cute one on knitty.com. Of course, with all those cables and bobbles, it wasn't a quickie so I just figured out the basic outline of her 10 lb dog pattern, did a ridiculously small tension swatch and then cast on what seemed like a reasonable number of stitches and knit a rectangle. I got a bit sneaky and used the casting off to sew up the legs and even used a version of the beaded cast off from splityarn for what I thought was going to be the neck. The legs turned out long enough that I didn't pick up any stitches to knit down cuffs and, in fact, turned up the cuffs a bit to shorten them. Even though the shrug is supposedly exactly the same top and bottom, I think the beads will work better at the bottom edge rather than the neck - maybe the cast off stretched the width?

I didn't have a dog handy to try this out on and our cats all objected strenuously, so I have no idea if it's anything even approximately Millie-shaped. I'm really anxious to learn whether or not it fits her and to see pictures if it does! Are you listening, Marg?

So now I have a date with a roast and the enormous new slow cooker that Ron got me for Christmas but then it's back to the looms - want to get Joey naked ASAP so I can dress him up in crackle (ooo, crackle for rocker upholstery - woot!) and I need to make some design decisions about the blanket for Letitia so that I can get that yarn ordered toot sweet. As I say, never a dull moment!

Tuesday, January 20, 2009

Endings and beginnings

The rosepath singles are nearly done! Could have stayed up to finish it tonight but decided to leave it until the morning so that I'll be more alert when I go over the yardage for skips or other glitches. I've also gotten the first couple inches of Joey's scarf started, so maybe I'll finish off that warp tomorrow as well. I need to get Joey cleared off so that I can get cracklin! Especially since the crackle's got to come off before the end of the month if I'm really going to do the scarf-a-day in February.

I'm off to tuck myself into bed with The Artist's Way - a glass artisan friend and I have agreed to at least read the book at the same time, though we've made no promises about actually doing any of the exercises. I must admit I'm pretty skeptical but I figure what the heck.

Monday, January 19, 2009

Row, row, row your boat...

Argh! Or should I say "Ark!"? I had very good intentions of weaving all day or until I finished my warp but Ron came down after I'd gotten a yard or so done and said, "omg, there's water on the floor!" Needless to say, this announcement heralded a change in plans.

We've had a fair bit of snow since Christmas and then frigid weather and now it's above freezing and simply gushing rain... or was until late this afternoon anyway. Looks like the snow and ice on the roof have worked the flashing round the chimney loose and now there's water seeping out from under the subfloor in my weaving room. He noticed it right away before it damaged anything (except for the subfloor itself, maybe - gah!) but we've spent the afternoon sopping it up as it appears so that it won't overflow its banks and spread across the wood floor.

Still, there's always a bright side! In this case, it's an exciting one, too. We moved a bunch of stuff out of the way of the rising tide, including a truly decrepit old rocker we've had for years and years1:


We've talked off and on about having it reupholstered or getting rid of it but have never done anything about either one... until now! I finally just bit the bullet and googled "furniture repair" for our area and - lo and behold! - there's a place just around the corner. Considering that we live in a residential area, this probably means that it's a home based business like mine, which always makes me happy. So I called her up, and then I took a whole whack of pictures and measurements and sent them off, and now I'm anxiously awaiting a rough estimate of what it'll cost to completely restore it.

So what's the fibre angle here, you're thinking... the angle is this: we're talking about recovering it in handwoven fabric, OF COURSE. Ron and I have talked for years about covering a couple of rockers with handwoven fabric and I even wove some samples ages ago that we thought would do nicely. Now it looks like it might actually become a reality, which would be Oh, So Cool.

I'm already envisioning submitting the covered chair for a show at the Centre for Craft and Design at some point and maybe taking orders for custom upholstery fabrics, too... Mmmm!

1. We didn't do that to the rocker, you understand. It was in that shape when we got it. Really.

In pursuit of fibre

I have vowed not to write much today, or at least not this morning, 'cause I really need to get to the looms. I was worried when I started blogging again that I'd wind up spending more time on the computer than weaving and so it has come to pass. Best head that action off at the pass, else I'll have to do some choosing. I want to have my cake and eat it too - high fibre cake, of course! - so today, just a few tiny tidbits.

1) I got mail from one of my favourite customers who, in addition to picking out some colours for a new wool blanket, has sent me some pictures of her babies, Bogie and Bailey, enjoying a blanket she's had for a few years now:


Aren't they cute little darlin's? I love to see cats on my blankeys - mosty 'cause I just love cats but also because it means they're really being used and not just folded up and put away. The blankets, that is, not the cats.

I have heard back from Aunt Janet re: her blanket as well, so now I've got two blankets waiting for the big loom. Really must get that rosepath stuff off so the blankets can go on!

2) I found a link to this very, very cute o w l s sweater by needled by reading the craftzine blog today. I am tempted and I have loads of chunky yarn to use but a sweater is an awfully big project and I'm trying to keep knitting projects small, both for sanity and for the sake of my wrists. Incidentally, in the context of her o w l s sweater, Wazzuki also has some very good things to say about the collaboration on and originality of designs and remuneration for design work, etc. Things I wrestle with myself on an ongoing basis. If you're interested, you'll find them here, near the bottom of the post.

3) I ran across Bonnie Tarses' Weaving Spirit blog on which, among other things, she has kits for sale. The idea for kits has been on my mind for some time, since even before the Yarn Barn asked for permission to kit the project I had in the ND07 issue of Handwoven magazine. I need to do a lot more research but I'm thinking about selling pre-wound warps for several of my placemat colour palettes and possibly some of the scarves as well. Will have to investigate how to put them on the blog, the shop website, and in the shop this summer as well.

4) Am still toying with my 'scarf a day' project idea. Whether I go ahead with it will depend largely on how much weaving I can get done in the next two weeks. More info on this to follow!

Oops, better post and get off the comp as it's 11:59 aye em and I want to at least get downstairs this morning! Must fly!

Saturday, January 17, 2009

ER Heddles to the rescue!


As I was threading the warp I talked about a few days ago, I realized that I'd under estimated the number of heddles I needed on shaft 3, by a dozen or so. As luck would have it, I realized this once I had the warp half threaded and was at the centre of the loom near the treadle cords, where it's most awkward to add heddles without unthreading everything. It's possible, mind you, and I've done it but it's no picnic and usually requires about five hands and a fair bit of swearing.

Fortunately, I had a stroke of laziness and thought of a trick to try. It worked so well that I thought I'd share, in case someone out there hasn't already thought of this. One caveat: this works with string or texsolv heddles and on a loom with wide, wooden heddle bars, like a Glimakra. I haven't tried it on Joey so am not sure how it could be adapted to metal heddles on a skinny metal bar.

To make two ER heddles:

1) You need: two texsolv or string heddles the same size as those already on your loom and a safety pin. The pin should be at least as long as the heddle bar is wide but not too long - you don't want any more stuff than strictly necessary getting tangled up under there.

2) First, thread an end of Heddle 1 through an end of Heddle 2, then through the other end of Heddle 1.

3) Pull on the loose ends of both heddles to pull the slack out of the knot. As it begins to snug up, you'll see that Heddle 1 is forming a lark's head knot around the end of Heddle 2. Pull on the end of Heddle 1 to flatten it out, so that the two heddles together form a square or granny knot. It should look like Picture 3.

4) Pull the knot up tight, then drape the heddles over the top heddle bar with one heddle hanging in front and the other behind. Make sure they hang past the lower bar in the same configuration, then safety pin the bottom of the heddles together under the lower bar. This maneuver is easier if you've lifted the bottom heddle bar slightly to take the tension off the heddles.

Then just go ahead and thread the two heddles like they were on the bar normally. When I did this, the front one tended to sit slightly to the right of the back one, so I threaded that one first. When you're threading and there's no tension on the warp threads the heddles will shift up and down rather alarmingly but don't worry. Once there's tension on the warp threads, they'll want to find a happy medium and, since both threads are on the same shaft, they'll even themselves out.

As you can see from the first pic, I added 12 ER heddles all in one spot. You can see all the safety pins holding the bottoms of them. You'd think it would be especially problematic to cheat so much all in one spot and, had I realized sooner that I was running out of heddles, I would have spaced the cheater heddles out some across the width of the warp. Much to my relief, however, it worked so well that I can't even tell where they are when I'm weaving. Frankly, I'd forgotten all about doing this until today.


Here's the proof: these are same threads from the first pic. Can you see any unevenness where the ER heddles are? I bet you can't!

Thursday, January 15, 2009

Oh Boy Oh Boy Oh Boy!

I got the best email tonight! My Auntie Janet wrote to ask if I would weave her a blanket. Will I weave her a blanket? Of COURSE I'll weave her a blanket! I'd LOVE to weave her a blanket!

I should perhaps point out that Aunt Janet is not my biological aunt, but rather my dear ol' mum's BFF1 since their college days. She gave me the very first thing I ever ever got, i.e. MY NAME, so I am totally excited to be able to give her something back.

1. Ye gods, did I actually just use the term 'bff'? That is the one (1) and only time I've ever done that. May it also be the last.2

2. For the benefit of the aforementioned dear ol' mum, who I know reads my blog occasionally, and anyone else who might not know: BFF means "best friend forever".

Wednesday, January 14, 2009

Gonna Get My Flannel On

Finally got to the store and got some flannel to trim the baby blankets with:


Am very anxious to get it into the wash so I can try out my enormous 1" wide bias tape maker. Will keep you posted... (ha!)

Shark infested waters

Was reading through a few pattern books yesterday when it dawned on me: I thought I'd planned enough warp on this latest experiment to do two projects, one short cocoon thing and one longer coat-like thing, but they need two panels each and i'd forgotten to double the lengths. Ho hum. I guess I get one project! And then as I was tying on last night (at 1:00 aye em, I might add) I realized that the samples I'd woven last year to decide how to set this wool were done in plain weave and my current experiment is twill, so it should have been set closer. Did I set it closer for this project? No, I did not.

However! I am neither dismayed (much) nor deterred! This is simply an opportunity to practice what I preach to my students and tell myself: no one else can see the image you had in mind when you started this project, so they'll never notice the ways in which it isn't like the original plan! They will simply see a lovely piece of weaving and no one will ever know it wasn't what you intended.

Unless, you know, you blab about it to everyone online. Ahem.

Two lessons here: I always think more clearly at 1:00 aye em than at 1:00 pee em, and whenever experiments go absolutely swimmingly, watch for sharks.


As you can see, I went right ahead and started weaving the twill at 10 epi and even though Oh My Goodness I have to beat lightly, I think it'll work. The little zig zags are beginning to appear just as they ought (shark alert?) and I'm hopeful once it's wet finished and all pulls together, it'll be a very light and lovely fabric. There'll be plenty for one cocoon and maybe some leftovers for some of the other things I started cooking up as I laid in bed last night, so who cares about the missing coat that only I know about? Not me!

A Cracklin' Good Time


That, my friends, is a leetle bit of crackle weave, woven in 1979(!!!) by some nameless member of the Guild of Canadian Weavers and included in their February newsletter from that year. Why have I shared this little darlin' with you? Because I have Crackle on the brain, that's why!

A bit of back story is in order. Last month at our Christmas party, I suggested to my weavers' guild that we start a study topics program to combat our recent bout of lethargy. The idea is that we'll take turns coming up with topics that we're interested in and then every couple months we'll start in on a new one. The weaver who proposed that month's topic will kick things off, maybe with a related draft, maybe with a bibliography and then we'll all go home and read up on the topic du jour and hopefully weave samples to bring back and share with the others. Since it was my idea, I offered to get things rolling and for my topic I chose crackle.

Why crackle, you ask? Because I know next to nothing about it. Years ago, when I first started weaving, a then-member of the guild told me that she preferred crackle to overshot. I probably had a vague idea of what overshot was by then but crackle was a completely unknown quantity. Years later I know a fair sight more about overshot, including the fact that I don't much care to weave it. Don't much care for it in general, in fact. This is practically heretical around here in overshot country but there it is: I Do Not Like Overshot. And so, although I still know hardly anything about crackle, it has always tantalized me as being a reasonable alternative to the other.

So anyway, we had our January guild meeting tonight and I did my little crackle song and dance, complete with bibliography and handouts. One of the other weavers also brought in her GCW newsletter from 1979 with attached sample to share with the rest of us. Everyone seemed to approve and some even seemed kinda excited, which was pretty groovy and exciting for me as well. Lethargy is bad, m'kay?

Incidentally, if anyone else out there is interested in crackle, you should hurry hurry hurry over to Peg from South Carolina's Talking About Weaving blog, which has tons of inspiring and informative stuff on it, and perhaps also read Ralph Griswold's monographs on designing with crackle and crackle tie ups and treadlings.

Now I've just got to weave off the scarf warp still on the small loom so I can dress it with one of the many, many crackle drafts I scrounged up and find out if I like crackle any better than That Other One!